
10 Easy Ways to Infuse Autumn Magic Into your Home: A roundup of our favorite autumn projects & crafts
Autumn is full of sensory-rich experiences - the crunch of leaves in shades of red, yellow, and orange, the beautiful late afternoon sunlight, the chill in the air that makes you tug on a sweater, and the scent of apples, cinnamon, and pumpkin, of roasting root vegetables, and baking pies. It’s quite the feast, and I love leaning in to all the autumn goodness. Sharing a few of our favorite autumn projects that are beautiful, fun, and easy!
1) Build a pumpkin house
This one comes from Woodlark, and it’s such a fun, easy project to work on with your little one, especially if they enjoy “small world play” (play involving the creation of little scenes with characters). My 4 year old loves this concept, so this was on our list to accomplish this fall. Here’s what we did!
Cut the top off your pumpkin
Cut out windows on either side, and a door in front
Decorate with the following:
Twigs/sticks - we used a hot glue gun to glue together sticks for the ramp leading up to the door, and to create the swing; we were able to just jam in the sticks for windows and the swing
Moss - we had some moss leftover from previous projects, and used it for the floor of the house, and to decorate the outside. We used a hot glue gun to put some on the top as well, hiding where the stem had popped off!
Wood pieces - leftover from another project, strewn around the huse
Twine - to make the swing
Rocks - to decorate in and around
Small animals for play!
Other decor ideas:
Acorns
Leaves
Pinecones
Seeds
Dried flowers


2) Create a pumpkin patch play area
This one was a HUGE hit this year! Perfect for hours of imaginative play, especially if you’re visiting a pumpkin patch this year, and your kiddos love to recreate their adventures in their small world play. It’s mid October, and my son has been playing with it daily for a couple weeks now. This idea comes from Early Childhood Fun 101.
Use a hot glue gun and popsicle sticks to make the fence, with small pieces of cardboard as the connectors, and to allow it to bend
Use cardboard and popsicle sticks to make the checkout stand, along with a cardboard roof. Hot glue gun everything together
Get creative with signage and decor! We used felt for the flags, and little cardboard and popsicle stick signs

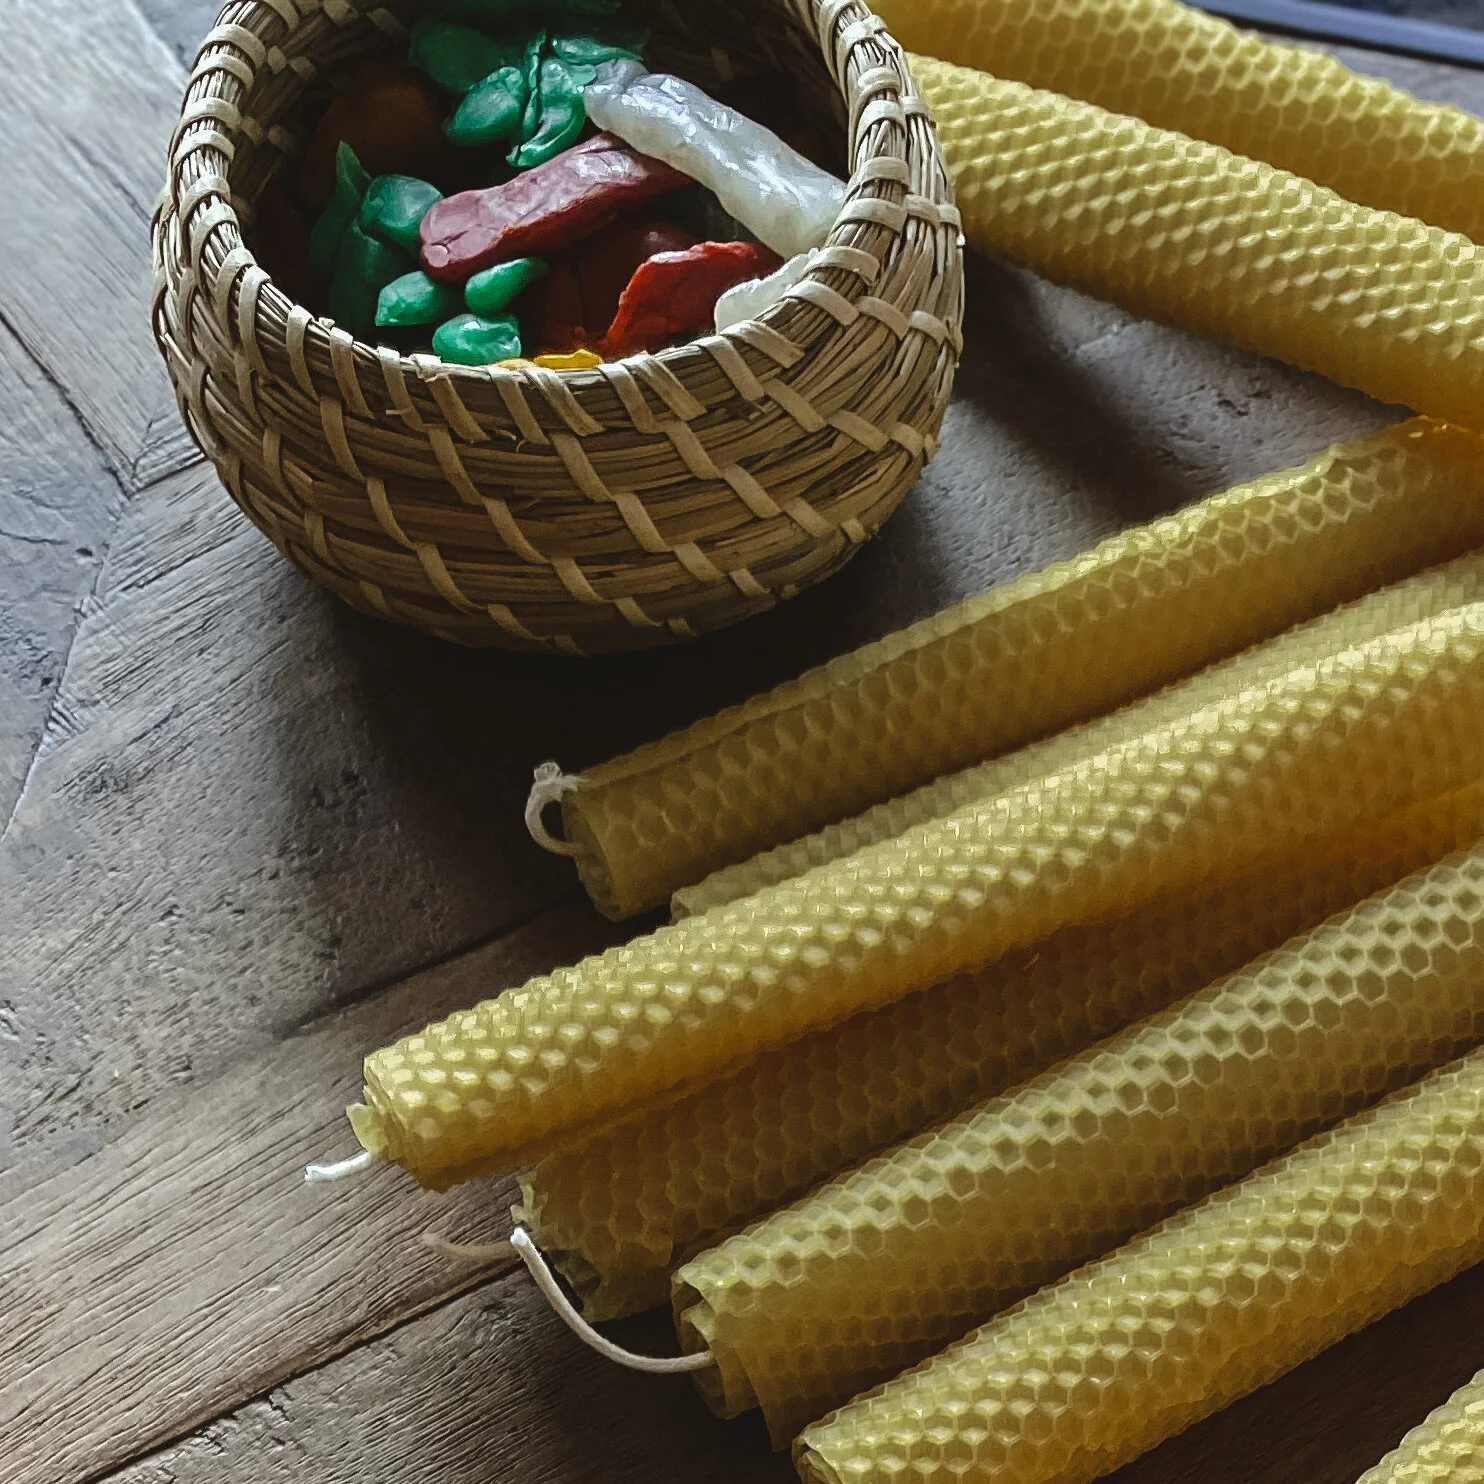
3) Collect autumn leaves and dip them in beeswax
I’m still waiting on the leaves to turn this year, so we haven’t done this one yet this season, but had a lot of fun with it last year. This one ends with a stunning end product that lets you enjoy the preserved leaves for a long time to come. String them up with clothespins on twine for a garland, or scatter them on your nature table for decoration! So many folks have done this one, but my favorite how-to comes from Lacy Arrowsmith who has a beautiful highlight on her instagram page on the entire process, plus lots of great ideas for using the leaves.
Here’s how we did them:
Collect all the beautiful shades of autumn leaves
Create a double boiler (or just a metal bowl in a saucepan) to melt your beeswax pellets
Line a shallow pie pan with foil and pour the liquid wax in.
Dip your leaves in one by one, coating entirely, and lay on parchment to dry
When leaves are dry, use as decor! I love to use clothespins to attach them to twine, making a garland for the mantle.
4) Create a lantern to light up the dark evenings
This one is so magical and beautiful, especially during our dark PNW autumn and winter nights. Two ways to make these lanterns:
The first idea comes from Raising Up Wildflowers. We haven’t done this one yet, but it’s on deck for November! Here’s how (she’s got a lovely video at the link above!):
Blow up a balloon to any size you’d like
Use mod podge to attach small pieces of tissue paper to your balloon, ~4 layers (letting it dry between each layer)
Mod podge leaves on top, and let dry, then use a hot glue gun to stick leaves down onto balloon
When dry, pop balloon, and stick a faux tealight candle inside!
Another lantern idea from Bella Luna toys. We did something similar last year, but want to try again this year with beautiful leaves in addition to the tissue paper. Here’s what you do:
Find a glass jar that you are done using, wash and remove any paper
Cut various colors of tissue paper into squares and/or collect leaves
Dilute two parts glue to one part water and mix with a brush (I used mod podge, but Elmer’s works too)
Brush glue on your jar, then cover with tissue paper or leaves. brush more glue on top to smooth out. Repeat to cover entire jar. Not too many layers that it becomes too opaque.
Let dry overnight, then pop in a candle!
The Bella Luna post also has a fun idea for finger knitting a handle for your lantern, but you could also make a handle by tying some twine around the top, and tying another loop around the sides of the twine for the handle
5) Make beeswax creations to decorate your beeswax candles
This lovely and simple idea comes from Our Song of Home. You can certainly make your own beeswax candles from scratch, but the easier way to do it is to just buy the sheets of beeswax and roll them yourself (that’s what we do all year long!) Then use modeling beeswax to shape into your creations and press onto the candles, placing them near to the bottom, so that they burn last, and you can enjoy the decorations a bit longer! More on using modeling beeswax here. And also in my November Morning Basket Guide.


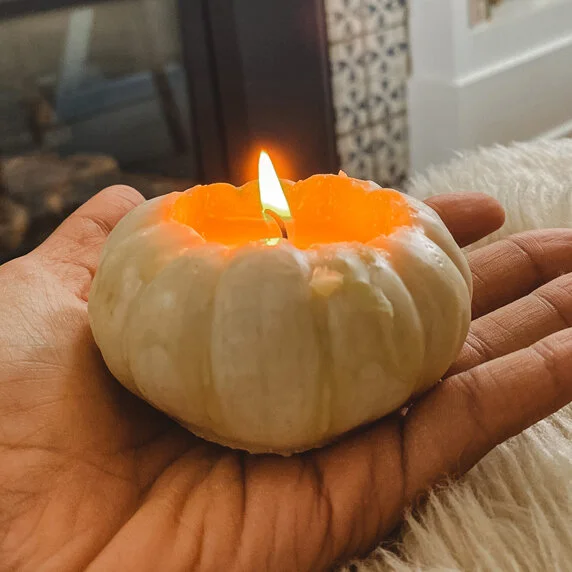
6) Make your own pumpkin candles
This one is easy, fun, and takes under 10 minutes to make! Makes for beautiful centerpiece decor, or putting up on your mantle. Here’s what I did:
make sharp cuts around outside of mini pumpkins, then pop the top off, being careful not to go through when cutting
scoop out the insides
melt beeswax pellets in a double boiler on the stove (I just used a metal bowl in a pan)
pour melted wax into pumpkins, adding a couple drops of essential oil
when it’s formed up a touch, stick wicks in, cutting down to size

7) Create felted wool autumn decor; acorns, apples, and pumpkins
New to felting? Start with wet-felted acorns! We are working our way through the Peaceful Press Tree Guide and came across the sweetest idea for wool-felted acorns. Here’s how:
Pop the tops off of collected acorns
Gather up some wool roving, like this and a small dish of dish soap and water
Pull of a small piece, and form into a ball, wrapping tightly in both directions until fibers are firmly connected
Dip your ball into the soap mixture, and continue rolling and wrapping, dipping, drip-dry, and rolling one or two more times.
Let dry, then attach the acorn top with a hot glue gun.
Use for decor (we used on our nature table!) or string into a necklace, or ornament for your Christmas tree.
We also made some needle felted apples this year! For this, you’ll need wool roving, a felting needle, and a felting cushion, so it’s a bit more involved. The original idea for these came from from Bella Luna Toys with a wonderful tutorial from Little Minds Creative.
Here’s what we did:
Gather red or green wool roving for the apples, roll into a ball-like shape in your hands, until fabric is well intertwined
Place the apple on your felting pad and poke into an apple shape; poke repeatedly in the center to create a hole for the stem
Use a small twig, glued to the center hole, for the stem, and cut a small green leaf out of felt to glue on as well


The process for the pumpkins is similar to the apple but you’ll sew on the stem and make indents for the sides of the pumpkin. Here’s the gist of it:
roll your wool roving into a ball until fibers are interwoven nicely
poke with felting needle until shape begins to form and it is tightly woven
create a small insert in the middle for the stem by poking repeatedly in the center
cut a small piece of green felt, fold in half and sew together, placing it in the hole, and then continue sewing to form the lines of the pumpkin: from where the end of the stem touches the pumpkin, push needle through and out the bottom, then wrap back around to the top, over and over on the sides, creating the desired indents
The Magic Onions has a nice tutorial on it, if you’d like to try it out.

8) Make autumn sensory play dough
This is another one that’s great for endless play; we’ve been using it for weeks now, and for many different projects beyond just open play - we’ve shaped into a dragon for Michaelmas, used some to make tree faces, and more. Use your favorite play dough recipe. I used the one from Woven Childhood (link https://www.instagram.com/wovenchildhood/ ) but I used gluten free flour, and added a little tapioca and coconut flour to get the texture right. I added cinnamon, Thieves oil, and cacao powder. To play: pinecones, acorns, leaves, twigs, pie cut outs, and whatever else seems fun and seasonal!


9) Nature Pumpkin decor
If you’re looking to avoid pumpkin carving, this is a really fun idea we might try, from Tara at Little Pine Learners.
First, prep your nature items (leaves, flowers, etc.) by pressing inside a book, and placing heavy books on top, leaving for a week or so. Alternatively, you can buy pre-pressed nature items.
Then, layer on mod podge glue (working in small areas at a time to avoid drying out), press on the items, and layer again with mod podge
10) Ghost Leaves!
One more from Ashley at Woodlark, that we’d like to try, to decorate the front door! to round out this list! These ghost leaves are so festive, and very simple and fun for little hands to make. Simply gather some large leaves, paint them white, and paint on some eyes and a mouth to look like a ghost!
